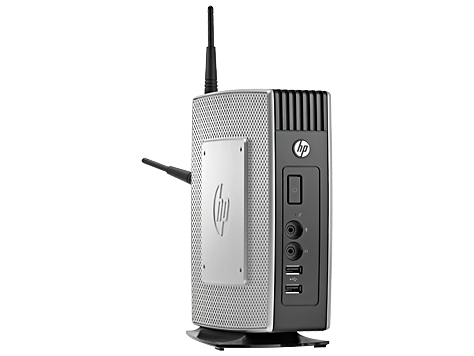
HP T510 Internet Radio
System spec:
Installation: Tiny Core Plus
CPU: Via Eden 1GHz
SSD: 1GB IDE Flash Module
RAM: 2GB DDR3
Wifi: Broadcom BCM43228
|
I had a Thin client lying around and I wanted a Internet Radio in my kitchen. The radio hooked to the kitchen speakers has a bad antenna so I figured
to get a cheap USB powered FM-transmitter to let the Thin Client communicates with the old Radio.
This Thin Client has a 1GB IDE Flash Module... a storage capacity insufficient to install Windows so I thought A Great way to learn Tiny Core

I asked my questions on this form and the support was awesome...
Great thanks to Juanito, Misalf, gerald_clark, coreplayer2, curaga, patrikg and polikuo for helping me out.


1. Install Tiny Core Plus
2. Install WiFi Driver
3. Make WiFi connection
4. Auto connect to Wifi on boot
5. Get sound working
6. Install a player and make it open a internet radio on boot.
7. Make the power button press initialize Shutdown
1: Installing Tiny Core Linux PlusMake a Bootable Tiny Core Linux Plus USB and boot from it.
Select:
Boot Core with X/GUI (TinyCore) + Installation extention.
1. Click on the tc-install icon on the right in the appbar
2. Click on the “Path to core.gz:” white bar
3. Click on the “Show:” drop down menu and select All Files (*)
4. Double click on mnt/
5. Double click on sdb1/
6. Double click on boot/
7. Select core.gz
8. Click on OK
9. Mark Whole Disk
10. “select disk for core” click on sda
11. Click 4X on the right arrow
12. Click on Proceed
When installation is complete, remove your Boot USB and Click on the most left icon in the appbar.
Click OK to Shutdown.
2: Installing WiFi driver:*Internet needed
Click on “Apps” In the Appbar, in the top left corner click the Apps button.
Click on Cloud (remote)
Click on browse… search for nano (program to edit and save files)
Install nano.tcz
Search for wl and install the wl-modules-(current version)-tinycore.tcz extention.
Open terminal and type
nano /etc/sysconfig/tcedir/boot/extlinux/extlinux.confUse the arrow keys to go to the back of the longest line and add: blacklist=b43,ssb,bcma
Ctrl + O (Save) *press enter Ctrl + X (Exit)
Backup your files
filetool.sh -b3: Make Wifi connection:Click on “Apps” In the taskbar, in the top left corner click the Apps button.
Click on Cloud (remote) (you need to be connected to Ethernet by cable to load the extension library)
Click on browse… search for wifi
Install wifi.tcz
Disconnect your Ethernet cable
filetool.sh –b sudo exitcheck.sh reboot Click on the WiFi icon.
Insert the number corresponding with your detected WiFi and enter password if needed.
4: Auto connect to Wifi
Edit the bootlocal file to attempt connection at boot time (optional)
nano /opt/bootlocal.sh/usr/local/bin/wifi.sh -a 2>&1 > /tmp/wifi.log
So it looks like:
#!/bin/sh
# put other system startup commands here
/usr/local/bin/wifi.sh -a 2>&1 > /tmp/wifi.log
Ctrl + O (Save) *press enter Ctrl + X (Exit)
Finally be sure to backup before poweroff or reboot.
filetool.sh -bsudo exitcheck.sh rebootWhen your system is booted again open a terminal and ping google.com:
ping -c2 google.com5: Get Sound workingInstall extensions
Install alsa.tcz
Install asla-config.tcz
Load alsa-config before asla
nano /etc/sysconfig/tcedir/onboot.lst and put asla-config.tcz just above alsa.tcz
Ctrl + O (Save) *press enter Ctrl + X (Exit)
Auto unmute and set volume to 83 on boot
echo "amixer set "Master" 39 unmute" > ~/.X.d/alsaunmuteMake a backup
filetool.sh -bsudo exitcheck.sh rebootTo test the audio
speaker-test -Ddefault:0 -c2 -t wav -l16: Install a player and make it open a internet radio on boot.Install extensions
Install mplayer.tcz
Make file
Nano ~/.X.d/PlayradioContaining:
{
while true; do ping -c1 91.221.151.155 && break || sleep 1; done
xterm -e mplayer "
http://91.221.151.155:80/;?.mp3"
} &
Ctrl + O (Save) *press enter Ctrl + X (Exit)
The http://91.221.151.155:80/;?.mp3 is the adres of the file with is streamed from the internet Radio Website
7: Make the power button press initialize ShutdownInstall extensions
Install acpid.tcz
Make needed directory
Sudo mkdir /usr/local/etc/acpi/actions/You need to create two files
FILE 1
Sudo Nano /usr/local/etc/acpi/actions/powerbtn.shContaining:
#!/bin/sh
exitcheck.sh
Ctrl + O (Save) *press enter Ctrl + X (Exit)
FILE 2
Sudo Nano /usr/local/etc/acpi/events/power-buttonContaining:
event=button/power
action=/usr/local/etc/acpi/actions/powerbtn.sh
Ctrl + O (Save) *press enter Ctrl + X (Exit)
Make powerbtn.sh executable
sudo chmod +x /usr/local/etc/acpi/actions/powerbtn.shSave acpi settings
(add extension to backup directory or nothing from this step will be saved after reboot)
Sudo nano /opt/.filetool.lstAdd: usr/local/etc/
Ctrl + O (Save) *press enter Ctrl + X (Exit)
Start acpid daemon on boot
Nano /opt/bootlocal.shAdd: /usr/local/etc/init.d/acpid start
Ctrl + O (Save) *press enter Ctrl + X (Exit)
Backup
filetool.sh -b